Why Alt Text Is Crucial for SEO & Accessibility
Alt text is a key component for both SEO and accessibility, helping search engines understand image content and enabling visually impaired users to access infor...
6 min read
SEO
Accessibility
+3

Learn how to add images in HTML using the img tag. Discover best practices for src, alt attributes, responsive images, and optimization techniques for web performance.
You can add an image with HTML by using the <img> tag with the src attribute pointing to your image URL and the alt attribute for accessibility. The basic syntax is: <img src="image-url.jpg" alt="Description of image">
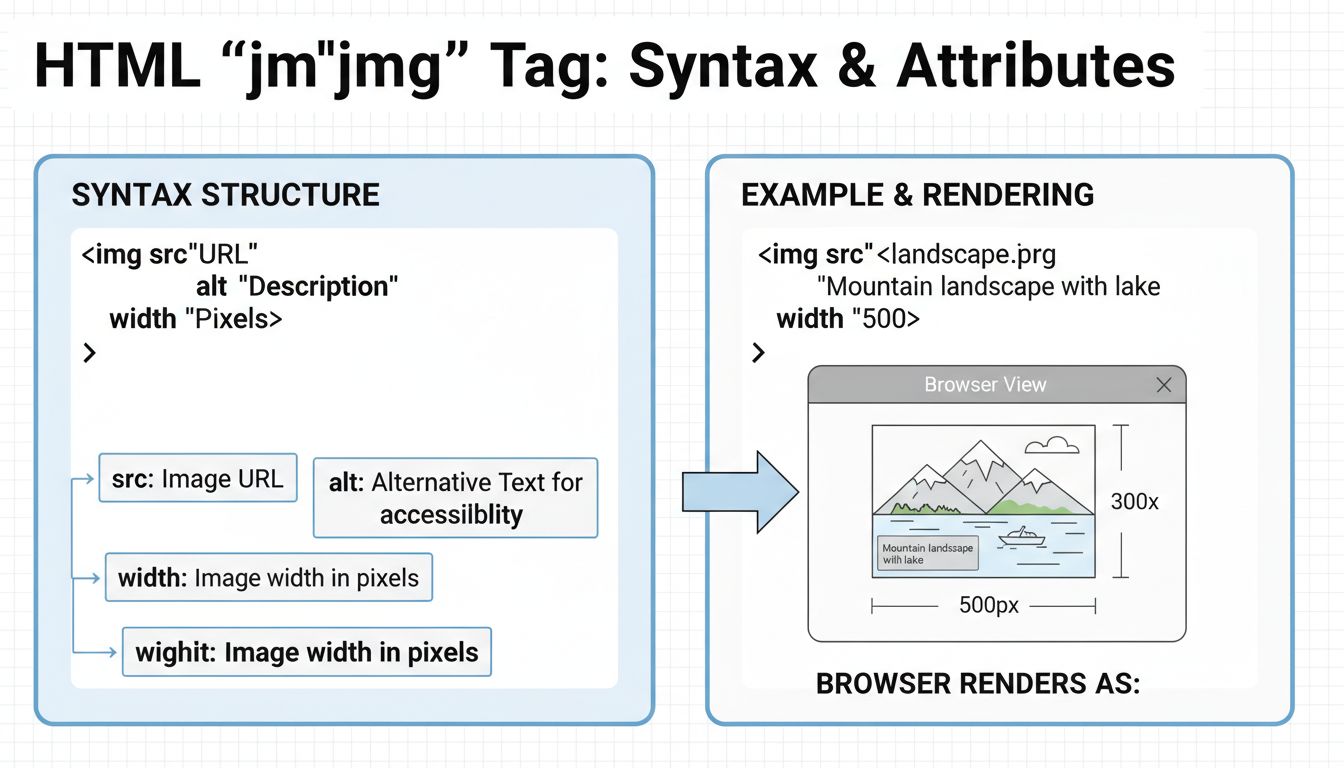
The <img> tag is a fundamental HTML element used to embed images directly into web pages. Unlike many other HTML tags, the <img> tag is a void element, meaning it doesn’t have a closing tag and cannot contain any child content. This self-contained structure makes it efficient for displaying images across all modern browsers. The tag requires at least two essential attributes to function properly: the src attribute to specify the image source and the alt attribute to provide alternative text for accessibility purposes. Understanding these core attributes and their proper implementation is crucial for creating accessible, performant, and SEO-friendly web pages.
The most straightforward way to add an image to your HTML page is by using the <img> tag with the src attribute. The src attribute contains a URL pointing to the image you want to embed, which can be either a relative URL (pointing to files within your website) or an absolute URL (pointing to external resources). For example, if your image file is named landscape.jpg and sits in the same directory as your HTML page, you would embed it using <img src="landscape.jpg" alt="A beautiful landscape">. If the image is stored in a subdirectory called images, the syntax becomes <img src="images/landscape.jpg" alt="A beautiful landscape">. This flexibility allows developers to organize their image assets efficiently while maintaining clean, maintainable code structures.
When using absolute URLs to embed images from external sources, the syntax follows the pattern <img src="https://example.com/images/landscape.jpg" alt="A beautiful landscape">. However, it’s important to note that while absolute URLs work, they are generally not recommended for images you own or control. Hosting images on your own server using relative URLs is more efficient for maintenance and performance optimization. Additionally, never hotlink to images on someone else’s website without explicit permission, as this practice is considered unethical and violates bandwidth usage agreements. This means the image owner would bear the bandwidth costs for serving your content, and you have no control over whether the image remains available or gets replaced with inappropriate content.
| Attribute | Purpose | Example | Required |
|---|---|---|---|
| src | Specifies the image source URL | src="image.jpg" | Yes |
| alt | Provides alternative text for accessibility | alt="Description of image" | Yes |
| width | Sets the image width in pixels | width="400" | No |
| height | Sets the image height in pixels | height="300" | No |
| title | Displays tooltip on hover | title="Image description" | No |
| loading | Controls lazy loading behavior | loading="lazy" | No |
| srcset | Specifies multiple image sources for responsive design | srcset="small.jpg 480w, large.jpg 1024w" | No |
The alt attribute deserves special attention as it serves multiple critical functions beyond basic accessibility. This attribute provides alternative text that displays when the image cannot be loaded due to broken links, slow internet connections, or when users have disabled image loading to conserve bandwidth. For screen reader users and visually impaired visitors, the alt text is read aloud, making it essential for web accessibility compliance. Search engines also utilize alt text to understand image content, which directly impacts your SEO rankings. When writing alt text, be descriptive but concise—avoid phrases like “image of” or “picture of” since screen readers already announce the element type. Instead, focus on conveying the meaningful content and context of the image.
Specifying the width and height attributes in your <img> tag is a best practice that significantly improves page rendering performance. When you include these dimensions, the browser knows exactly how much space to reserve for the image before it finishes downloading, preventing the layout shift that occurs when images load after the page has already begun rendering. This layout shift, known as Cumulative Layout Shift (CLS), negatively impacts user experience and search engine rankings. By declaring dimensions upfront, you maintain a stable layout throughout the loading process, allowing users to interact with the page smoothly without content jumping around unexpectedly.
The implementation is straightforward: <img src="image.jpg" alt="Description" width="400" height="300">. These values represent the image dimensions in pixels and should match the actual image size to avoid distortion or quality degradation. If you need to resize an image for display purposes, use CSS instead of HTML attributes. For example, you could use <img src="image.jpg" alt="Description" width="400" height="300" style="max-width: 100%; height: auto;"> to create responsive images that scale appropriately on different devices while maintaining the aspect ratio. This approach ensures that the browser reserves the correct space while allowing the image to adapt to various screen sizes, providing an optimal viewing experience across all devices.
To make an image function as a hyperlink, wrap the <img> tag with an <a> (anchor) tag. The href attribute of the anchor tag specifies the destination URL. The complete syntax is: <a href="https://example.com"><img src="image.jpg" alt="Description of image"></a>. This technique is commonly used for logo links, call-to-action buttons, and navigation elements. When creating clickable images, ensure that the alt text clearly describes both the image content and the link destination, providing context for users relying on screen readers. For example, instead of just alt="Logo", use alt="Visit our homepage" to indicate the link’s purpose.
You can also link to specific sections within the same page using anchor links. To do this, use the hash symbol followed by the target element’s ID: <a href="#section-id"><img src="image.jpg" alt="Jump to section"></a>. The target section must have a corresponding ID attribute: <h2 id="section-id">Target Section</h2>. This technique is particularly useful for creating table of contents, navigation menus, and improving user experience by allowing quick navigation within long pages. Additionally, you can style clickable images using CSS to provide visual feedback, such as adding borders, changing opacity on hover, or applying shadow effects to indicate interactivity.
For more complex scenarios requiring different parts of an image to link to different URLs, use the <map> and <area> elements to create image maps. This technique allows you to define clickable regions within a single image: <img src="image.jpg" usemap="#image-map" alt="Description"><map name="image-map"><area shape="rect" coords="34,44,270,350" href="https://example1.com" alt="Area 1"><area shape="circle" coords="337,300,44" href="https://example2.com" alt="Area 2"></map>. The coordinates define the clickable regions, with “rect” for rectangles and “circle” for circular areas. While powerful, image maps can be difficult to maintain and are less flexible than modern responsive design approaches.
For truly responsive images that adapt to different screen sizes and device capabilities, use the <picture> element combined with srcset attributes. This modern approach allows you to serve different image files based on viewport width, device pixel ratio, or image format support: <picture><source media="(min-width:650px)" srcset="large-image.jpg"><source media="(min-width:465px)" srcset="medium-image.jpg"><img src="small-image.jpg" alt="Description"></picture>. This technique ensures optimal image delivery across all devices, improving both performance and user experience. The browser evaluates media queries in order and displays the first matching source, with the <img> tag serving as a fallback for older browsers.
When implementing images in HTML, follow these essential best practices to ensure optimal performance, accessibility, and SEO results. First, always use descriptive filenames for your images—instead of img835.png, use landscape-mountain-sunset.jpg. Search engines read filenames and use them for indexing, so descriptive names improve your SEO rankings. Second, optimize image file sizes before uploading to your website by using appropriate formats (JPEG for photographs, PNG for graphics with transparency, WebP for modern browsers) and compression tools. Large image files slow down page load times, negatively impacting user experience and search rankings.
Third, implement lazy loading for images below the fold using the loading="lazy" attribute: <img src="image.jpg" alt="Description" loading="lazy">. This defers image loading until the user scrolls near the image, reducing initial page load time and bandwidth consumption. Fourth, use CSS background images only for decorative images, reserving HTML <img> tags for content images that carry semantic meaning. Fifth, ensure all images have meaningful alt text that describes the content and context, not just the visual appearance. Finally, consider using a Content Delivery Network (CDN) to serve images from servers geographically closer to your users, significantly improving load times and overall performance. These practices collectively create a robust, accessible, and performant image implementation strategy that benefits both users and search engines.
Master image optimization and web development with PostAffiliatePro's powerful affiliate management platform. Create stunning visual content for your campaigns.
Alt text is a key component for both SEO and accessibility, helping search engines understand image content and enabling visually impaired users to access infor...
Learn how to write effective alt text for images. Discover best practices for accessibility, SEO optimization, and specific guidelines for different image types...
Learn what good alt text looks like with practical examples. Discover best practices for writing concise, specific alt text that improves accessibility and SEO ...
Join our community of happy clients and provide excellent customer support with Post Affiliate Pro.
