Learn three proven methods to add CSS to HTML: external stylesheets, internal styles, and inline CSS. Discover best practices, cascading order, and when to use each approach for optimal web development.
How can I add CSS to HTML?
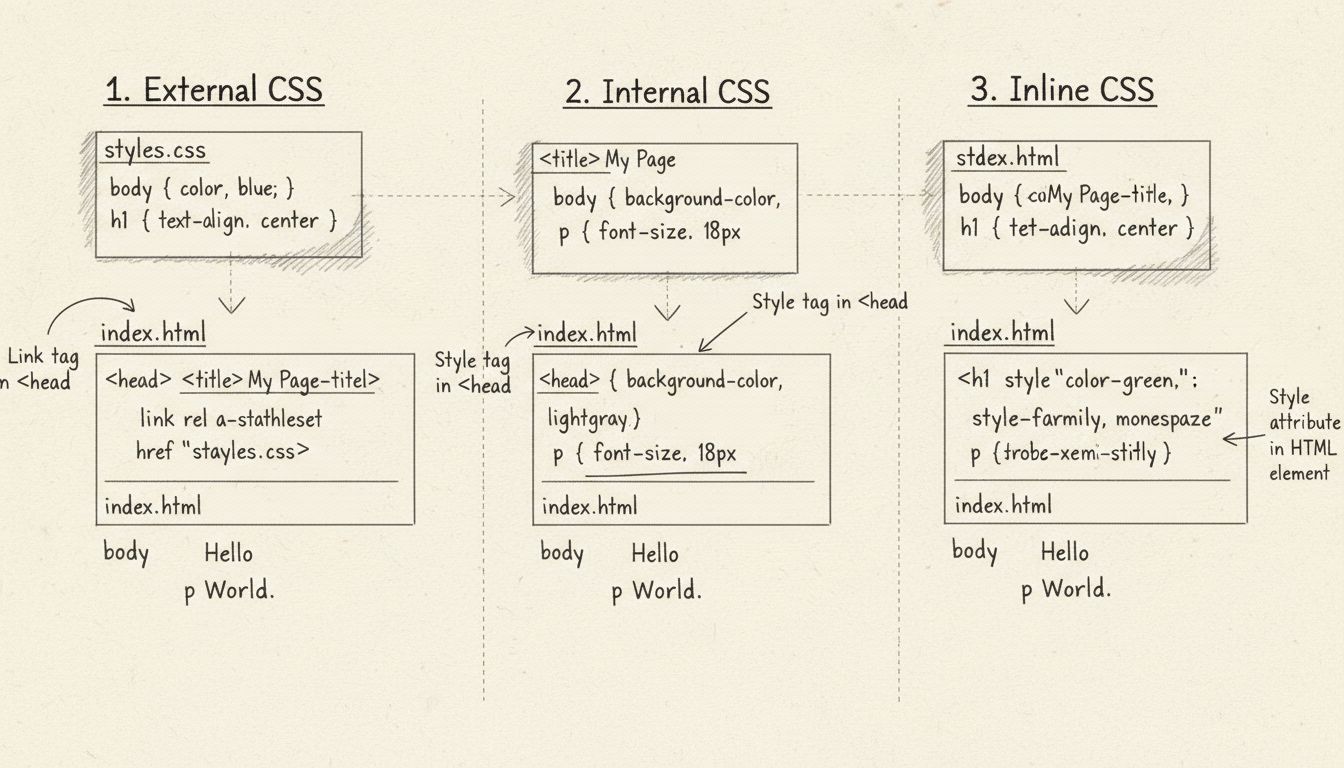
You can add CSS to HTML using three methods: external CSS with the <link> tag in the head section, internal CSS with the <style> tag in the head section, or inline CSS with the style attribute directly on HTML elements. Each method has different use cases and advantages for managing your website's styling.
Understanding CSS Integration Methods
Adding CSS to HTML is one of the fundamental skills in web development, and understanding the different approaches available is essential for creating well-structured, maintainable websites. CSS (Cascading Style Sheets) is a powerful styling language that controls the visual presentation of HTML elements, and there are three primary methods to integrate it with your HTML documents. Each method has distinct advantages and specific use cases that make it suitable for different scenarios in web development. The choice between these methods depends on your project requirements, the scope of styling needed, and how you want to organize your code for maximum efficiency and maintainability.
Method 1: External CSS with the Link Tag
External CSS is widely considered the best practice for most web projects because it provides excellent separation of concerns and allows you to manage all styling in a single location. When using external CSS, you create a separate .css file that contains all your style rules, and then link it to your HTML document using the <link> tag placed in the <head> section. This approach offers numerous advantages including better code organization, easier maintenance, improved caching by browsers, and the ability to reuse the same stylesheet across multiple HTML pages.
To implement external CSS, you need to create a CSS file (for example, styles.css) and place it in your project directory. Inside your HTML file’s <head> section, you add a link tag with the following syntax:
<!DOCTYPE html><html>
<head>
<linkrel="stylesheet"href="styles.css">
</head>
<body>
<h1>Welcome to My Website</h1>
<p>This content is styled by external CSS.</p>
</body>
</html>
Your external CSS file (styles.css) would contain rules like:
The rel="stylesheet" attribute tells the browser that the linked file is a stylesheet, while the href attribute specifies the path to your CSS file. You can use relative paths (like styles.css for files in the same directory) or absolute paths. The major advantage of this method is that the browser caches the CSS file, meaning subsequent page loads are faster because the stylesheet doesn’t need to be downloaded again.
Aspect
External CSS
File Location
Separate .css file
Reusability
Can be used across multiple HTML pages
Caching
Browser caches the file for better performance
Maintenance
Centralized styling management
Best For
Large projects, multiple pages, team environments
Performance
Excellent for production websites
Method 2: Internal CSS with the Style Tag
Internal CSS involves placing your style rules directly within the <head> section of your HTML document using the <style> tag. This method is useful when you have styling that applies only to a single HTML page or when you want to keep everything in one file for simplicity. Internal CSS provides a middle ground between external and inline styling, offering better organization than inline styles while maintaining everything in a single file.
To use internal CSS, you simply add a <style> tag in the <head> section of your HTML document:
<!DOCTYPE html><html>
<head>
<style>
body {
  background-color: #f5f5f5;
  font-family: Arial, sans-serif;
  margin: 0;
  padding: 20px;
}

h1 {
  color: #333;
  font-size: 2.5em;
  margin-bottom: 20px;
}

p {
  color: #666;
  line-height: 1.6;
  font-size: 1.1em;
}
</style>
</head>
<body>
<h1>Welcome to My Website</h1>
<p>This content is styled by internal CSS.</p>
</body>
</html>
Internal CSS is particularly useful for single-page applications, quick prototypes, or when you need page-specific styling that shouldn’t be shared with other pages. The <style> tag must be placed in the <head> section, not in the body, to ensure proper rendering. One important consideration is that internal styles are not cached separately from the HTML file, so if you have large stylesheets, they will be downloaded with every page load, potentially affecting performance on larger projects.
Method 3: Inline CSS with Style Attributes
Inline CSS involves adding the style attribute directly to individual HTML elements. This method applies styles to a single element only and is the most specific form of CSS styling. While inline CSS can be useful for quick fixes or testing, it’s generally discouraged for production websites because it mixes content with presentation and makes maintenance difficult.
While inline styles work and can be useful in specific scenarios, they have significant drawbacks. They cannot be reused across multiple elements or pages, they make your HTML code harder to read and maintain, and they have the highest specificity in the CSS cascade, making them difficult to override if needed. Additionally, inline styles are not cached separately, so they increase the size of your HTML file and can negatively impact page load times.
Understanding the CSS Cascade and Specificity
When multiple CSS rules apply to the same element, the browser uses a cascading order to determine which styles take precedence. This cascading order is crucial to understand when working with different CSS methods. The specificity hierarchy, from lowest to highest priority, is: browser defaults, external and internal stylesheets (with the last one read taking precedence), and inline styles. This means that inline styles will always override external or internal styles for the same property, which is why inline CSS should be used sparingly.
The cascade also considers the order in which stylesheets are loaded. If you have multiple external stylesheets or multiple <style> tags, the last one loaded will override previous rules for the same selectors. This is why it’s important to organize your stylesheets carefully and understand the order of precedence. Additionally, CSS specificity plays a role in the cascade—more specific selectors (like ID selectors) override less specific ones (like element selectors), regardless of the order they appear in the stylesheet.
Best Practices for Adding CSS to HTML
For modern web development in 2025, external CSS is the recommended approach for most projects. It provides the best separation of concerns, allows for code reuse across multiple pages, enables browser caching for improved performance, and makes your HTML files cleaner and easier to maintain. When working with external CSS, organize your stylesheets logically, use meaningful class and ID names, and consider using CSS preprocessors like SASS or LESS for more advanced styling capabilities.
Internal CSS should be reserved for single-page applications or when you have styling that’s truly unique to one page. Inline CSS should be avoided in production code except in rare circumstances where you need to apply styles dynamically through JavaScript. By following these best practices and understanding when to use each method, you’ll create more maintainable, performant, and professional websites that are easier for teams to work with and for browsers to render efficiently.
Streamline Your Affiliate Marketing with PostAffiliatePro
Just as CSS separates styling from HTML content, PostAffiliatePro separates affiliate management complexity from your core business. Manage commissions, track conversions, and automate payouts with the industry's most powerful affiliate software.
How Can I Make a Link Redirect? Complete Guide to URL Redirection Methods
Learn how to implement link redirects using server-side methods (PHP, ASP), HTML meta refresh, and JavaScript. Understand SEO implications and best practices fo...
Types of Links: Complete Guide to Internal, External & Backlinks
Comprehensive guide to different types of links including internal links, external links, backlinks, active links, inactive links, dofollow, nofollow, and more....
How Can I Find Cloaked Links? Complete Detection Guide
Learn proven methods to detect cloaked links including HTML inspection, CSS analysis, JavaScript testing, and SEO tools. Comprehensive guide to finding hidden l...
10 min read
You will be in Good Hands!
Join our community of happy clients and provide excellent customer support with Post Affiliate Pro.